In this article, I’m going to tell you about the android splash screen. How you can make or create a splash screen with animations or without animation in android. It is very easy and simple, just read throughout the article and you will be mastered it. Hope you will get what you want.
What is an Android Splash Screen?
It is the first screen that a user sees. It is also called the Welcome Screen of an Android app.
Why do we need it?
We generally make beautiful splash screens in android because of the following reasons:
- To make a positive impact on the user as it is the first screen.
- To load the relevant data or content without making the user wait.
- Prevent the user from seeing the background loading of an app.
Difference between Activity and Android Splash Screen?
There is a little difference between both and that is Activity is the first screen on which users interact whereas, the splash screen is the first screen that a user sees but cannot interact with it.
The steps that we need to follow to create a splash screen in android are:
Method 1: Classical Approach without animation
Steps to follow in Method One are:
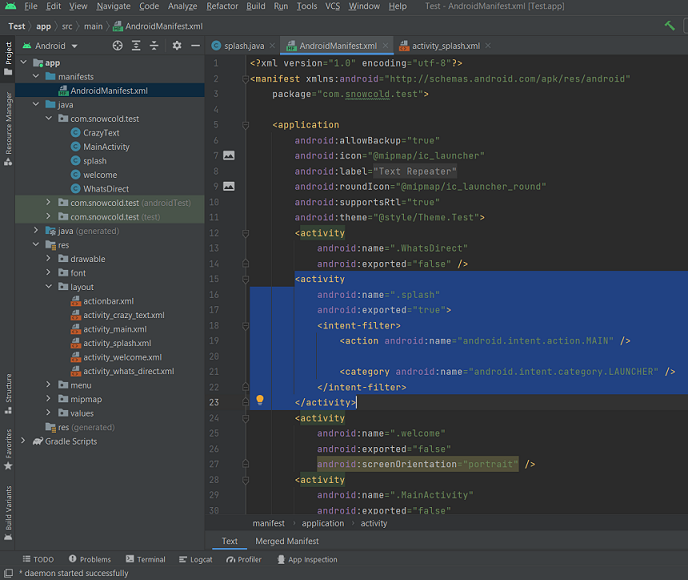
- Make Splash screen the launcher screen or the first screen to open in-app. Copy the code below and paste it into the Manifest file. Replace the .splash with the activity name that you want to put in your app for the first screen.
Code to Put in Manifest File.
<activity
            android:name=".splash"
            android:exported="true">
            <intent-filter>
                <action android:name="android.intent.action.MAIN" />

                <category android:name="android.intent.category.LAUNCHER" />
            </intent-filter>
        </activity>
- Take ImageView and TextView in the splash layout file or other components that you want to put on the splash screen.
Splash Layout XML File.
<?xml version="1.0" encoding="utf-8"?>
<androidx.constraintlayout.widget.ConstraintLayout xmlns:android="http://schemas.android.com/apk/res/android"
    xmlns:app="http://schemas.android.com/apk/res-auto"
    xmlns:tools="http://schemas.android.com/tools"
    android:layout_width="match_parent"
    android:layout_height="match_parent"
    android:background="#000000"
    tools:context=".splash">

    <ImageView
        android:id="@+id/imageView"
        android:layout_width="271dp"
        android:layout_height="254dp"
        app:layout_constraintBottom_toBottomOf="parent"
        app:layout_constraintEnd_toEndOf="parent"
        app:layout_constraintStart_toStartOf="parent"
        app:layout_constraintTop_toTopOf="parent"
        app:srcCompat="@drawable/text_repeater_new_2" />

    <TextView
        android:id="@+id/textView"
        android:layout_width="wrap_content"
        android:layout_height="wrap_content"
        android:fontFamily="sans-serif-smallcaps"
        android:text="2022"
        android:textColor="#FFFFFF"
        android:textSize="48sp"
        android:textStyle="bold"
        app:layout_constraintBottom_toBottomOf="parent"
        app:layout_constraintEnd_toEndOf="parent"
        app:layout_constraintStart_toStartOf="parent"
        app:layout_constraintTop_toBottomOf="@+id/imageView"
        app:layout_constraintVertical_bias="0.048" />
</androidx.constraintlayout.widget.ConstraintLayout>
- Make a Post Handler in the Splash java file that will handle the function or intent that we declare there. Post Handler will be started/initiated after the given time in milliseconds at post delayed function.
- In the Handler function, we created an Intent that goes from the splash screen to another screen after 1.5 seconds.
- finish() Keyword is used to destroy the splash screen once it is executed so that the user cannot return to that screen again by mistake if he/she clicks the back button or due to any other action.
- if you don’t know how to switch between activities: click here
- to know about Intents: click here
Main Code for the splash screen is:
new Handler().postDelayed(new Runnable() {
            @Override
            public void run() {
                Intent wel = new Intent(splash.this, welcome.class);
                startActivity(wel);
                finish();
            }
        },1500);
Let’s understand the main code briefly:

Splash screen Java File or Logic file.
import androidx.activity.result.contract.ActivityResultContracts;
import androidx.appcompat.app.AppCompatActivity;

import android.content.Intent;
import android.os.Bundle;
import android.os.Handler;


public class splash extends AppCompatActivity {

    @Override
    protected void onCreate(Bundle savedInstanceState) {
        super.onCreate(savedInstanceState);
        setContentView(R.layout.activity_splash);


        new Handler().postDelayed(new Runnable() {
            @Override
            public void run() {
                Intent wel = new Intent(splash.this, welcome.class);
                startActivity(wel);
                finish();
            }
        },1500);
    }


}
Result for Classical approach:
There will be no animation effects in this approach.

Method 3: Modern Approach with Animation
There is not much difference between the classical approach and the modern approach except for animation functionality.
Animation in splash screen can be done using various libraries that are available on Github.
We can add this functionality using AndroidView Animation Library: Click here to know about it like how to install it or use it in your app. By using this library we can add moving or animation effects to most of our components that are present in the android studio like TextView, ImageView, etc.
How to implement this library:
To implement this library, you need to add dependency of this library into your (build. Gradle) module file and click on sync now to sync that library with your project. as per shown in the below screenshot.
Add dependency to project:
implementation 'com.daimajia.androidanimations:library:2.4@aar'

- Add the same code in the Manifest file too to make the splash screen a launcher screen or the first screen by default to open in-app.
Code to Put in Manifest File.
<activity
            android:name=".splash"
            android:exported="true">
            <intent-filter>
                <action android:name="android.intent.action.MAIN" />

                <category android:name="android.intent.category.LAUNCHER" />
            </intent-filter>
        </activity>
- Use TextView and ImageView in the splash screen layout file for building and animation. You can choose any other components too.
Splash screen XML layout file:
<?xml version="1.0" encoding="utf-8"?>
<androidx.constraintlayout.widget.ConstraintLayout xmlns:android="http://schemas.android.com/apk/res/android"
    xmlns:app="http://schemas.android.com/apk/res-auto"
    xmlns:tools="http://schemas.android.com/tools"
    android:layout_width="match_parent"
    android:layout_height="match_parent"
    android:background="#000000"
    tools:context=".splash">

    <ImageView
        android:id="@+id/imageView"
        android:layout_width="271dp"
        android:layout_height="254dp"
        app:layout_constraintBottom_toBottomOf="parent"
        app:layout_constraintEnd_toEndOf="parent"
        app:layout_constraintStart_toStartOf="parent"
        app:layout_constraintTop_toTopOf="parent"
        app:srcCompat="@drawable/text_repeater_new_2" />

    <TextView
        android:id="@+id/textView"
        android:layout_width="wrap_content"
        android:layout_height="wrap_content"
        android:fontFamily="sans-serif-smallcaps"
        android:text="2022"
        android:textColor="#FFFFFF"
        android:textSize="48sp"
        android:textStyle="bold"
        app:layout_constraintBottom_toBottomOf="parent"
        app:layout_constraintEnd_toEndOf="parent"
        app:layout_constraintStart_toStartOf="parent"
        app:layout_constraintTop_toBottomOf="@+id/imageView"
        app:layout_constraintVertical_bias="0.048" />
</androidx.constraintlayout.widget.ConstraintLayout>
- Import the daimajia yoyo library using the import keyword in the splash java file. Copy and paste the below code. You can copy the whole splash screen java file from the below.
Import yoyo library
import com.daimajia.androidanimations.library.Techniques;
import com.daimajia.androidanimations.library.YoYo;
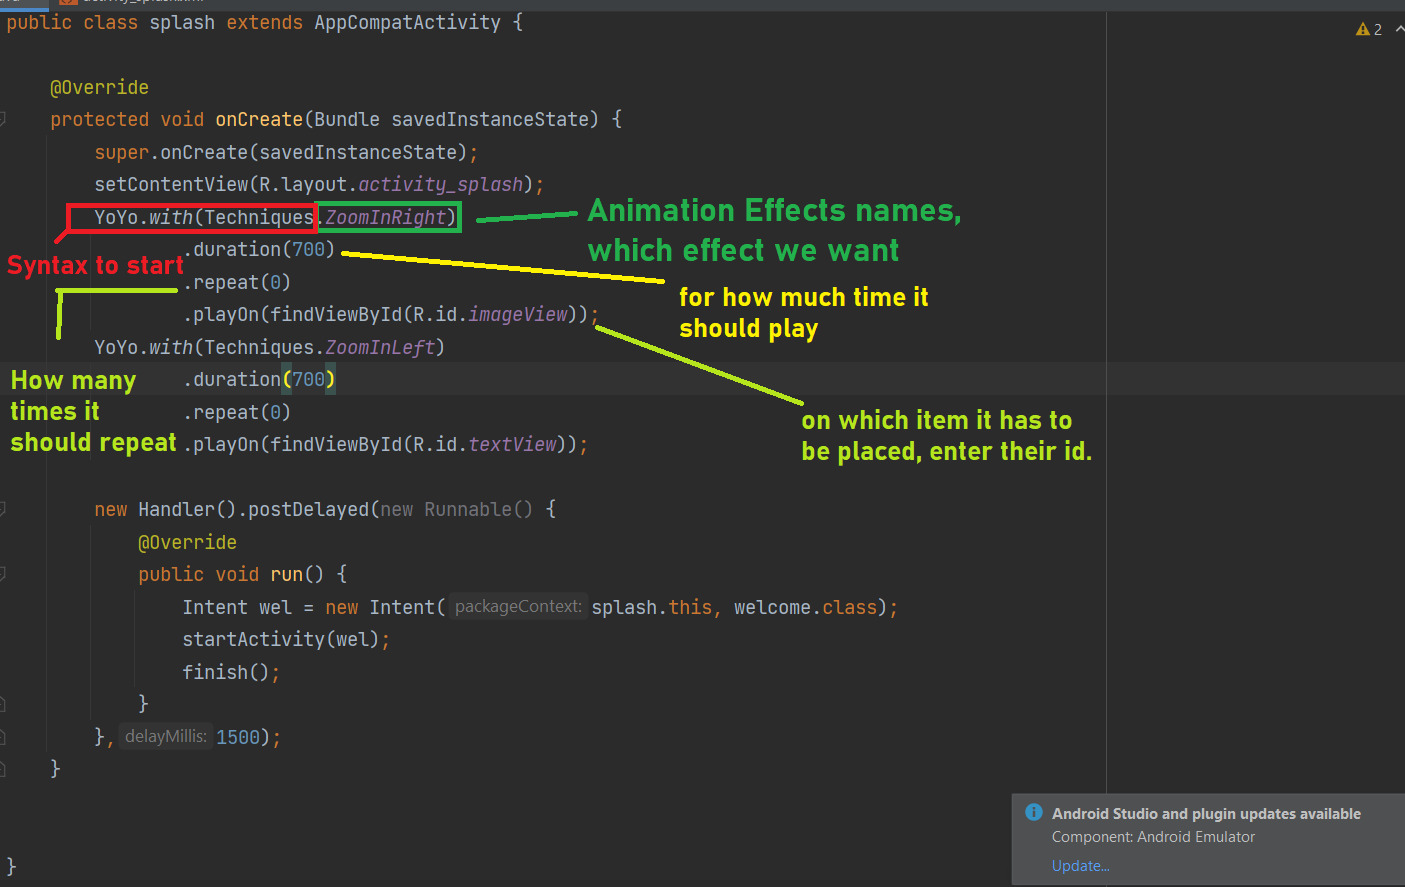
- The main code by which we can add animation functionalities is:
we have to add this code in the onCreate method.
Main driver code for animation
YoYo.with(Techniques.ZoomInRight)
                .duration(700)
                .repeat(0)
                .playOn(findViewById(R.id.imageView));
Let’s understand the functionality of code clearly, and how it works.
Splash screen Java File:
import androidx.activity.result.contract.ActivityResultContracts;
import androidx.appcompat.app.AppCompatActivity;

import android.content.Intent;
import android.os.Bundle;
import android.os.Handler;

import com.daimajia.androidanimations.library.Techniques;
import com.daimajia.androidanimations.library.YoYo;

public class splash extends AppCompatActivity {

    @Override
    protected void onCreate(Bundle savedInstanceState) {
        super.onCreate(savedInstanceState);
        setContentView(R.layout.activity_splash);
        YoYo.with(Techniques.ZoomInRight)
                .duration(700)
                .repeat(0)
                .playOn(findViewById(R.id.imageView));
        YoYo.with(Techniques.ZoomInLeft)
                .duration(700)
                .repeat(0)
                .playOn(findViewById(R.id.textView));

        new Handler().postDelayed(new Runnable() {
            @Override
            public void run() {
                Intent wel = new Intent(splash.this, welcome.class);
                startActivity(wel);
                finish();
            }
        },1500);
    }


}
Result for Modern Approach:
Using the yoyo library we added the animation effect on the splash screen. The animation effect is on ImageView and TextView on the below screen.
Guys, if you have a problem, issue, or doubt regarding this article. Feel free to contact us anytime, we will resolve it for you ASAP.
We try our best to provide you with high-quality content. If you find it helpful then please do share it with others too. Check out more android tutorials here.