In Android, we get a autocomplete feature in EditText with the help of some controls or components called AutoComplete TextView or MultiAutoComplete TextView. In this article, we are going to explore both of these controls and learn about them. How do AutoComplete and MultiAutoComplete TextView works with custom adapters, what are their attributes, and how we can implement them in android?
What is AutoComplete TextView in Android?
AutoComplete TextView is a type of EditText in android, by which users can use the autocomplete feature when filling data in that EditText. In simple words, it is a process by which users can enter the values or data into text without typing it to the fullest. It automatically suggests some suggestions according to the user’s input and the user can select the values based on those suggestions.
Kindly note that AutoComplete TextView just takes one input at a time. A user can not select multiple values or data from it.
What is MultiAutoComplete TextView in Android?
MultiAutoComplete TextView is also a type of EditText and works the same as AutoComplete TextView in android. But there is a minor difference between them and it is, that in MultiAutoComplete TextView a user can select multiple values or data from suggestions separated with a comma, whereas in AutoComplete TextView it takes only one.
When should we use them?
It depends on situations like when a user has to enter only one value from the given data then we should use AutoComplete, if the user has to select multiple values then we should use MultiAutoComplete.
For example, users have to select one year from the given list of years. Data have four values 2019, 2020, 2021, and 2022 then auto-complete is best suited. If users have to select more than one year then MultiAutoComplete is best suited.
How to implement AutoComplete, MultiAutoComplete TextView with Custom Adapters in Android.
This is how we add AutoComplete TextView in android, MultiAutoComplete implementation using a custom adapter. Generating them is very easy. Let’s deep dive into the topic and mastered them. Hope you will learn from this tutorial.
Steps to follow to generate programmatically:
- Generate a Layout and use AutoComplete and MultiAutoCOmplete TextView in it as we did in the activity_main.xml file below.
- Declare and initialize them in the MainActicvity.java file.
- Make a String Array of custom data values. We have used 4 string values in it.
- Make a String ArrayAdapter and pass three arguments first one is of context means on which activity it should show. Enter the name of your activity following with .this keyword. Mine is MainActivity. The second argument is of type resource, Enter the ViewHolder layout type with the help of (android.R.layout). The third argument is to pass the array in which data is stored.
- After creating the adapter now set the adapter. If you are using a MultiAutoComplete Adapter then you have to add one more line to get multiple values selected in it that is a set tokenizer that separates the values by comma.
- Please see the output if you don’t understand what I mean. Stil Confused then just let me know I will help you personally.
activity_main.xml
<?xml version="1.0" encoding="utf-8"?>
<LinearLayout xmlns:android="http://schemas.android.com/apk/res/android"
    xmlns:app="http://schemas.android.com/apk/res-auto"
    xmlns:tools="http://schemas.android.com/tools"
    android:layout_width="match_parent"
    android:layout_height="match_parent"
    android:layout_marginTop="20dp"
    android:orientation="vertical"
    tools:context=".MainActivity">


<!-- Practice set 1 with auto complete and multi auto complete textview -->


    <TextView
        android:id="@+id/textView"
        android:layout_width="match_parent"
        android:layout_height="wrap_content"
        android:gravity="center"
        android:text="Auto complete and Multi  Auto Complete Text View"
        android:textColor="#7EAC3C"
        android:textStyle="bold" />

    <AutoCompleteTextView
        android:id="@+id/autoCompleteTextView"
        android:layout_width="match_parent"
        android:layout_height="wrap_content"
        android:layout_margin="10dp"
        android:textColor="#C32424" />

    <MultiAutoCompleteTextView
        android:id="@+id/multiAutoCompleteTextView"
        android:layout_width="match_parent"
        android:layout_height="wrap_content"
        android:layout_margin="10dp"
        android:textColor="#C32424" />

</LinearLayout>
MainActivity.java
import androidx.appcompat.app.AppCompatActivity;

import android.os.Bundle;
import android.widget.ArrayAdapter;
import android.widget.AutoCompleteTextView;
import android.widget.MultiAutoCompleteTextView;

public class MainActivity extends AppCompatActivity {

    // Declaring AutoComplete TextView
public AutoCompleteTextView mySingle;

// Declaring MultiAutoCompleteTextView
public MultiAutoCompleteTextView myMulti;

    @Override
    protected void onCreate(Bundle savedInstanceState) {
        super.onCreate(savedInstanceState);
        setContentView(R.layout.activity_main);

        // Defining the components to initialize or use them
        mySingle = findViewById(R.id.autoCompleteTextView);
        myMulti = findViewById(R.id.multiAutoCompleteTextView);

        // String Array with Values
        String[] values = {"StarTech City", "Android", "Example", "Auto and Multi"};

        // Defining and declaring ArrayAdapter of type String, First argument is of context, then resource layout, then array values to be used
        ArrayAdapter<String> myAdapter = new ArrayAdapter<>(this, android.R.layout.simple_list_item_1,values);

        //Setting up the Adapter for AutoCompleteTextView
        mySingle.setAdapter(myAdapter);

        //Setting up the tokenizer to store multiple values separated by comma
        myMulti.setTokenizer(new MultiAutoCompleteTextView.CommaTokenizer());
        //Setting up the Adapter for MultiAutoCompleteTextView
        myMulti.setAdapter(myAdapter);
    }
}
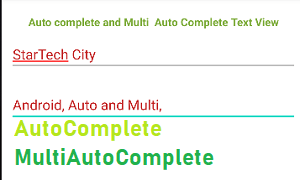
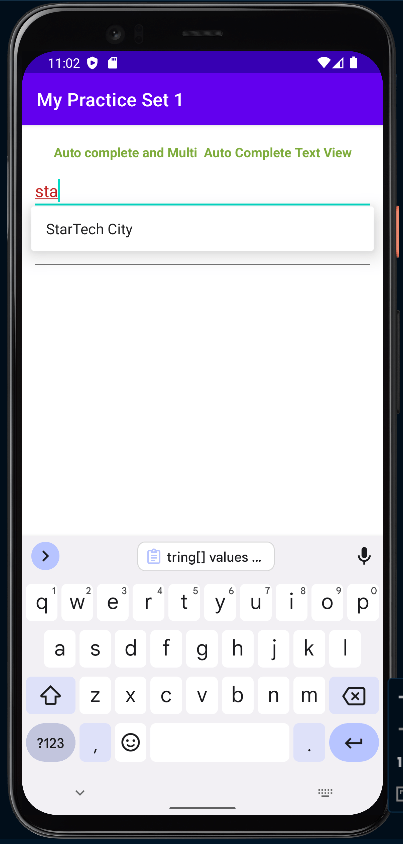
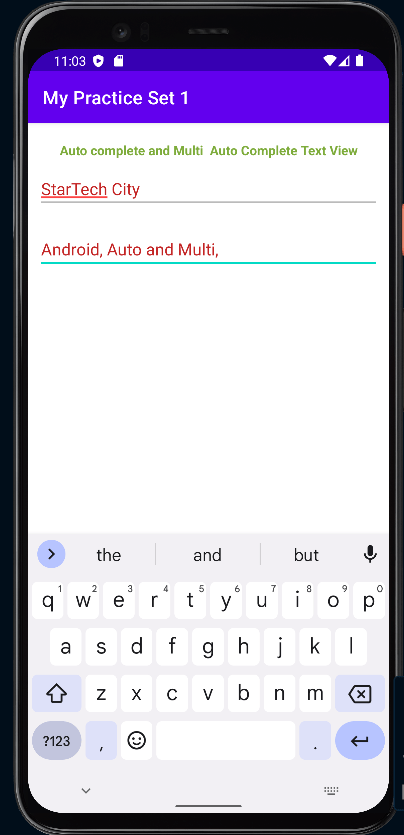
Output:
AutoComplete TextView Example:
MultiAutoComplete TextView :

Visualized the difference between AutoComplete and MultiAutoComplete TextView in Android.
Guys, if you like our work then please don’t forget to like and share it with others. I’m trying to provide you best quality content in easy and simple words and examples. Hope you will get some benefits from here.
Subscribe to my Youtube channel for android development tutorials: Success Assured